Easy Image Uploads with Firebase Storage and React Dropzone (Part 2)

This blog post is the second of a two-part series. This second part will spruce up react-dropzone and connect it to Firebase Cloud Storage.
Last time was more about setup. This time we are going to add some styling and upload functionality.
If you missed the first part of this series be sure to check it out.
Want to skip to the finished version of the code? Check the part-2 branch.
Before you start you can see the code in action.
Let's Get Started... Again
Add Charkra UI
We will use this awesome component library to very easily add some accessible an nicely styled components to our project.
yarn add @chakra-ui/react @emotion/react@^11 @emotion/styled@^11 framer-motion@^4
Let's Code
Use Chakra Provider
In order to get Chakra UI working correctly, we need to setup the ChakraProvider in the index.js file. Replace the entire file so it looks like this:
import React from 'react'
import ReactDOM from 'react-dom'
import { ChakraProvider } from '@chakra-ui/react'

import App from './App'
import * as serviceWorker from './serviceWorker'

import './index.css'

ReactDOM.render(
  <React.StrictMode>
    <ChakraProvider>
      <App />
    </ChakraProvider>
  </React.StrictMode>,
  document.getElementById('root')
)

serviceWorker.unregister()
This wraps the entire project with some Chakra UI goodness.
Use Chakra Components
Previously, we passed a style prop to the container component located in App.js. Instead of using inline styles we can use a Chakra UI Flex and Text components.
First import the required components at the top of the file:
import { Flex, Text } from '@chakra-ui/react'
The App component will now look like this:
function App() {
  const onDrop = useCallback((acceptedFiles) => {
    // Do something with the files
  }, [])
  const { getRootProps, getInputProps, isDragActive } = useDropzone({ onDrop })

  return (
    <Flex justify="center" align="center" textAlign="center" bg="#dadada" w={250} h={250} p={50} m={2} borderRadius={5} {...getRootProps()}>
      <input {...getInputProps()} />
      {isDragActive ? <Text>Drop the files here...</Text> : <Text>Drag 'n' drop some files here, or click to select files</Text>}
    </Flex>
  )
}
Here we are using the Flex component. The UI looks very similar, but our code is utilizing style props instead of inline styles.
We still deconstruct getRootProps() and pass in the resulting props.
There is no need to replace the input element with a Chakra UI component. That component has display: none; styling as a result of getInputProps(). Without deviating from the purpose of this blog post, we can just say this is how react-dropzone handles the input element.
You can also delete the extraneous containerStyle declaration.
Use Firebase Storage
Create a storage.js file in the src directory of the project. This file will contain all the Firebase Storage related code.
Place the following code in storage.js:
import firebase from './firebase'

export const uploadFromBlobAsync = async ({ blobUrl, name }) => {
  if (!blobUrl || !name) return null

  try {
    const blob = await fetch(blobUrl).then((r) => r.blob())
    const snapshot = await firebase.storage().ref().child(name).put(blob)
    return await snapshot.ref.getDownloadURL()
  } catch (error) {
    throw error
  }
}
We will call uploadFromBlobAsync when a file is dropped onto the dropzone. We do this by adding the following code to the onDrop function found in App.js:
const onDrop = useCallback(async (acceptedFiles) => {
  const file = acceptedFiles?.[0]

  if (!file) {
    return
  }

  try {
    await uploadFromBlobAsync({
      blobUrl: URL.createObjectURL(file),
      name: `${file.name}_${Date.now()}`,
    })
  } catch (e) {
    console.log(e)
  }
}, [])
First, we validate that we are receiving a file. If we have a found a valid file then we call uploadFromBlobAsync. Notice that we are using URL.createObjectURL to create a URL pointing to our file. That is a Web API that is compatible with most modern browsers.
Inform the User
We still need to let the user know the status of the upload. We do this by implementing React's useState hook.
First, in App.js we import useState using the existing import declaration:
import React, { useCallback, useState } from 'react'
Then at the start of the App function we use the hook to help us store state regarding the upload progress:
function App() {
  const [isLoading, setIsLoading] = useState(false)
  const [error, setError] = useState(null)
  const [message, setMessage] = useState(null)
The three state variables will be populated from the onDrop function. We add them and the function will now look like this:
const onDrop = useCallback(async (acceptedFiles) => {
  const file = acceptedFiles?.[0]

  if (!file) {
    return
  }

  setIsLoading(true)
  setError(null)
  setMessage(null)

  try {
    await uploadFromBlobAsync({
      blobUrl: URL.createObjectURL(file),
      name: `${file.name}_${Date.now()}`,
    })
  } catch (e) {
    setIsLoading(false)
    setError(e)
    return
  }

  setIsLoading(false)
  setMessage('File was uploaded 👍')
}, [])
The function now updates the state, however we are not showing the user the active state. We can update the returning component to let the user know the upload progress.
Import the Spinner component:
import { Flex, Text, Spinner } from '@chakra-ui/react'
Then add it to the returned component:
return (
  <Flex bg="#dadada" w={250} h={250} justify="center" align="center" p={50} m={2} borderRadius={5} textAlign="center" {...getRootProps()}>
    <input {...getInputProps()} />
    {isLoading ? <Spinner /> : isDragActive ? <Text>Drop the files here...</Text> : <Text>Drag 'n' drop some files here, or click to select files</Text>}
  </Flex>
)
The Spinner component will be displayed while isLoading is true.
We can add a Chakra UI Alert component to inform the user of errors and successful uploads. Further, we only need to display it if we have a message to show.
{
  ;(error || message) && (
    <Alert status={error ? 'error' : 'success'} w={250} borderRadius={5} m={2}>
      <AlertIcon />
      <AlertDescription w={200}>{error || message}</AlertDescription>
    </Alert>
  )
}
This component will be placed after the Flex component. However, we need to wrap both in a fragment.
When all is said and done App.js will look like this:s
import React, { useCallback, useState } from 'react'
import { useDropzone } from 'react-dropzone'
import { Flex, Text, Spinner, Alert, AlertIcon, AlertDescription } from '@chakra-ui/react'

import { uploadFromBlobAsync } from './storage'

function App() {
  const [isLoading, setIsLoading] = useState(false)
  const [error, setError] = useState(null)
  const [message, setMessage] = useState(null)
  const onDrop = useCallback(async (acceptedFiles) => {
    const file = acceptedFiles?.[0]

    if (!file) {
      return
    }

    setIsLoading(true)
    setError(null)
    setMessage(null)

    try {
      await uploadFromBlobAsync({
        blobUrl: URL.createObjectURL(file),
        name: `${file.name}_${Date.now()}`,
      })
    } catch (e) {
      setIsLoading(false)
      setError(e.message)
      return
    }

    setIsLoading(false)
    setMessage('File was uploaded 👍')
  }, [])

  const { getRootProps, getInputProps, isDragActive } = useDropzone({ onDrop })

  return (
    <>
      <Flex bg="#dadada" w={250} h={250} justify="center" align="center" p={50} m={2} borderRadius={5} textAlign="center" {...getRootProps()}>
        <input {...getInputProps()} />
        {isLoading ? <Spinner /> : isDragActive ? <Text>Drop the files here...</Text> : <Text>Drag 'n' drop some files here, or click to select files</Text>}
      </Flex>
      {(error || message) && (
        <Alert status={error ? 'error' : 'success'} w={250} borderRadius={5} m={2}>
          <AlertIcon />
          <AlertDescription w={200}>{error || message}</AlertDescription>
        </Alert>
      )}
    </>
  )
}

export default App
Wrap Up
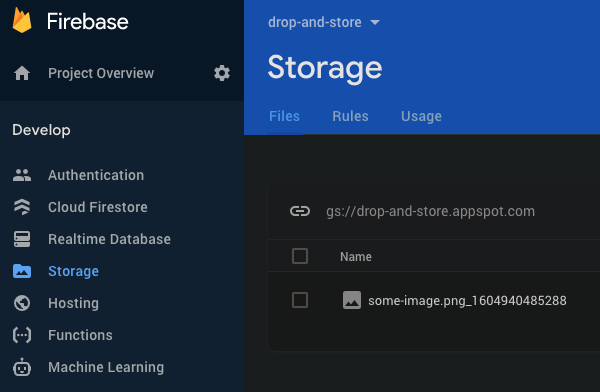
Go ahead and drag and drop a file. You will briefly see the loading indicator then a message will appear to inform you the file was uploaded. In the Firebase Console you can also see the file in your storage bucket. Success!

We have come a long way, now go ahead and implement this into your project. However, every project is unique so feel free to reach out to me if you hit any road blocks.